Make Your Presentation Handouts Look Professional without a Graphic Designer
 Last week was part one of How to Create the Perfect Presentation Handout. In that article and podcast, I gave you three easy ways to create helpful handouts to accompany your in-person presentations. This week, I’m going to show you how to style your presentation handouts so that they look really professional. The good news is that you don’t need any special graphic design skills, and you don’t need any special software. You can make everything that we are going to talk about today with just an internet browser.
![]()
Step #1: Use a Canva Template to Create a Great Presentation Handout.
Canva (https://www.canva.com) is one of those online resources where the more that you use it, the more that you can’t do without it. It is graphic design software, similar to Photoshop, but made for the amateur designer. The software is so easy to use, that you can be designing and editing professional graphics in minutes. The major difference between Canva and Photoshop though, (other than being really easy to operate) is that it is loaded with thousands of templates for just about anything that you want to create.
I was first introduced to Canva when I was looking for a way to create eye-catching social media images. I knew that if I wanted to post images that would get the attention of the casual Facebook or Twitter reader, that I had to create my own. (Stock photos just wouldn’t do.) I had invested in Photoshop, but since I didn’t have a lot of experience with it, the software was very frustrating. Then I was listening to a podcast by Michael Stelzner and Social Media Marketing, and they mentioned Canva. I tried it out for about 15 minutes, and I was hooked. In fact, most of the images that you see on my websites and social media accounts are created using Canva, now.
Create Your Background from Scratch or Start with a Template.
Because I’ve been using Canva for a while, I now publish most of my backgrounds from scratch. But when I first started using the website, I often used the pre-installed templates. If you decide to use a template, for a handout background, you might want to start with the “Letterhead” templates. Most of these letterhead templates have white backgrounds and really nice and colored borders, so they are ideal if you will be adding a lot of text. The great thing about the software is that if you find a design that you like, but you need to customize the colors, just click on the template, and it will load onto your design. Next just select the border or shape item that you want to alter, and a colored square will pop up in the top-left corner of the toolbar. Click the square, and you can change the color to any that you like.
If you decide to create the background from scratch, just click the “Use Custom Dimensions” button in the top-right corner of the Canva homepage, and enter 8.5 in X 11 in. You’ll start with a blank white page, but you can quickly add shapes, colors, images, and icons at will. You are only limited by your creativity. When I create a custom template or background, I usually use either a custom border or a half-page image.
 Custom Border: If I have a lot of text in my handout, or if want to include additional space for participants to write notes, I will design a custom border as a background. Most often, for branding purposes, I will make my border backgrounds look like my website. (Especially if I’m making a handout that participants can download from my website.) The important thing about this style is to make the border simple. Just a couple of colors with element shapes from Canva will do wonders. I’ve taken one of the example handouts from last week and added a custom border to make it look more professional. (click on the image to view a larger version.) Compare to the non-styled one by looking at the previous blog post.
- Half-Page mage Background If my handout needs to be eye-catching, and I can limit the content, I will use a large image. Most often, I will use a good-looking stock photo or photo from one of my classes or events as the centerpiece. The handout that I made for last week’s podcast uses this technique. An image of that handout is posted here. I know what you’re thinking… “I’m less of a photographer than I am a graphic designer. My photos aren’t good enough to have them take up half of my handout.” If you are thinking this, you are in the same boat as I am. Canva comes to the rescue here with Canva Pro.
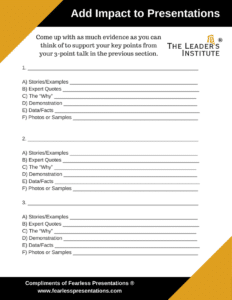 Custom Border: If I have a lot of text in my handout, or if want to include additional space for participants to write notes, I will design a custom border as a background. Most often, for branding purposes, I will make my border backgrounds look like my website. (Especially if I’m making a handout that participants can download from my website.) The important thing about this style is to make the border simple. Just a couple of colors with element shapes from Canva will do wonders. I’ve taken one of the example handouts from last week and added a custom border to make it look more professional. (click on the image to view a larger version.) Compare to the non-styled one by looking at the previous blog post.
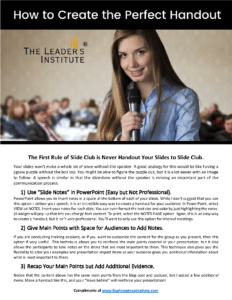 Half-Page mage Background If my handout needs to be eye-catching, and I can limit the content, I will use a large image. Most often, I will use a good-looking stock photo or photo from one of my classes or events as the centerpiece. The handout that I made for last week’s podcast uses this technique. An image of that handout is posted here. I know what you’re thinking… “I’m less of a photographer than I am a graphic designer. My photos aren’t good enough to have them take up half of my handout.” If you are thinking this, you are in the same boat as I am. Canva comes to the rescue here with Canva Pro.
For a small monthly fee, Canva will allow you to use royalty-free images that are fantastic. If however, you want to kick your images up a notch…
Download Professional Stock Photos on a Budget.
There are a lot of stock photo companies out there, and many are really good, but my favorite is ShutterStock. The reason I like this service so much is that the images are very economical, and they have just about any type of image that you’d ever want. In the past, I was using stock images so much for social media and my blogs that I had a monthly plan where I could download up to 50 different images per month for just $100. Now, though, I purchase five images for $49, and I have an entire year to choose which five images that I want to download. So, the images are only $9.80 each. Once you purchase the license for the picture, you can use it (and re-download it if needed) forever. This is a fantastic deal compared to companies like Getty that charge $500 per image, and you have to buy different licenses for each type of use.
ShutterStock actually has a built-in editor that you can use before you download the image. However, I have never been able to use it effectively. However, once you find the perfect image that you want to use, download it, and then upload it to Canva. You can then insert it into your half-page photo background, or you can edit it and alter it as needed. For examples of what you can do when you combine Canva and Shutterstock, go to my Instagram page at https://www.instagram.com/leadersinstitute/.
Once you have the background just like you like it, you can either download it as a PNG from Canva, or you can save your Canva background, copy it, and create your handout right in Canva itself.
If You Are Not Technical, Here is a Tip After Downloading Your Background.
To download your background from Canva, just click the Download button and select PNG. An image will be saved on your computer in your download folder. Open up Microsoft Word, Google Docs, or any other word processor. Insert the PNG that you created. Click the image and drag the corners to the edge of the page, so that the image takes up the whole page. In the top toolbar, you will see a new option called Format. Click that button, and select Wrap Text. Now, select the option to Send Behind Text. One last thing. Right-click the image, and select Size and Position. Select Position. De-select Move Object with Text and Select Lock Anchor Position. These little technical tricks will push the image to the background of the page so that you can type whatever you want on top of the photo without moving it. If you don’t do this, when you start typing your content for your handout, the image will move around and look strange. If you need a second page for your handout, just click anywhere on the image and Copy. Then on the new page, hit Paste. Viola, a professional handout without any technical or graphic design skills needed!