 This week, I was looking back over the 100 plus blog posts and podcast episodes that we have released. One of the things that hit me was that there is a very important part of the presentation that I have totally overlooked. In fact, this is one of the first things that I train my instructors on when I train new trainers. This important part of the presentation is the room setup. Proper room setup for a presentation can actually improve your performance in front of a group.
The downside is true as well. Improper conference room setup can actually make you more nervous and make delivering the presentation more difficult.
This post has two parts. Part one is about The Different Conference Room Styles. In that section, I’ll give you different conference room setup options with pros and cons of each. Then, in Part Two, I’ll give you the Best Practices for How to Set Up a Conference Room and how to set up a meeting room. These best practices will help you avoid some of the big mistakes that presenters make when they set up the tables, chairs, and audiovisual for meetings.
Want to beat stage fright, articulate with poise, and land your dream job?
Take the 2-minute public speaking assessment and get the Fearless Presenter’s Playbook for FREE!
Part One: The Pros and Cons of Different Conference Room Styles.
 In this section, I’ll give you a quick explanation of the different conference room styles. Each conference room style has its own advantages and disadvantages. So, before you pick the proper conference room style, start with the purpose of the meeting.
For instance, when I teach a leadership development class, I sometimes change the room set up at each break. This is helpful, because the purpose of the class is to increase the :comfort zone” of the participants. So, changing the way the chairs are set up or the way the tables are set up makes the participants have to move to a new seat each time.
When I teach the group how to remember names, a u-shaped room is ideal. That way, each person is able to view every other participant in the room. (They aren’t looking at the back of anybody’s head.)
However, when I cover a module on presentation skills, a chevron style classroom setup is better. This style allows the presenter to be the center of attention. It also lets every person in the audience have a great view of both the speaker and the speaker’s visual aids.
Then, in the same class on the afternoon of the first day, we cover meeting skills. In that session, I push two classroom tables together to make bigger meeting tables. And I put six to eight chairs around each table. This allows each table to operate as a separate group.
However, unless you are covering multiple topics in the same presentation, you shouldn’t need to do this, by the way. For example, when I teach a regular two-day public speaking class, I keep the same chevron-style class setting throughout the entire class.
The point is to alter the conference room set up to fit the needs of the audience. And when the needs change, alter the conference room set up as well.
List of Different Conference Room Styles:
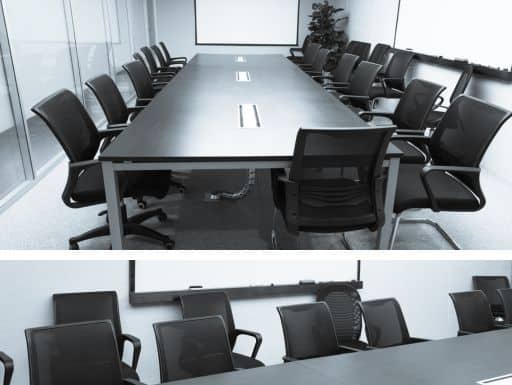
Boardroom Style: All the Participants Gather Around a Single Long and Skinny Boardroom Table.
 A Boardroom Style Room Setup is ideal for small groups (usually fewer than 12 people) where different speakers will present. This room style works best for staff meetings, project briefings, or problem-solving meetings. If the meeting is going to be fairly short and you will only have a single main speaker, this may be your ideal conference room setup.
One major advantage of the boardroom style is that almost every building has some type of conference room. Another is that the table is already set up in the room. Finally, this style is ideal if you want the participants to communicate with each other (from a seated position.) Everyone in the room can see each other face-to-face.
The major disadvantage, though is that the audio and visual components are often built into the room. So you lose a lot of flexibility with this room style. Also, when people design boardrooms, they often make the screen or display the center of attention. As a result, the presenter will often have to deliver the presentation from either side of the screen.
The other major disadvantage of this style is that if you have more than 12 people, the style doesn’t work very well. The room is too crowded and people have a hard time moving around to go to the restroom or get a coffee refill.
Still though, for a small group, a boardroom is often the best option.
U-Shaped Style: Tables Are Set in a Square Shape with One End Opened for the Presenter.
 The U-Shaped style conference setup is very popular for workshops and seminars where group size is between 12 and 20 people. Obviously, when set up this way, the tables look like the letter U. This room style is very similar to boardroom, but it will serve a slightly larger audience.
This room setup is also very easy. All you need is a minimum of three tables to set it up. The major advantage of the U-Shaped style is that the entire group can still see everyone in the room face-to-face. So, this setup is ideal for team meeting where you want the audience to communicate with each other and share ideas.
Just like with the boardroom style, though, the major disadvantage is the group size. As the group gets larger, you lose the major advantages. So, if you have 14 or 16 people, you get the same advantages of the boardroom even though the group is a little larger. However, at 18, 20, or 22 people, you begin to lose this advantage. It will be difficult and impractical to get all 22 people to participate in a discussion.
So, since you lose this value, as the group gets bigger, you may want to switch to a classroom setup.
Just as an FYI, there is an alternative style called the “open square” style. It is the same as U-Shaped, but the open end is closed off. Between you and I, I have never really found any value in this style. You lose a lot of the advantages of the U-Shaped style without adding ANY advantages.
Theater Style or Auditorium Style: Chairs Set Side-by-Side as in a Movie Theater.
 Theater Style is ideal for large groups where presenters are delivering information and aren’t looking for interaction. This style works best for large meetings where information will be shared from the front of the room or from a stage.
The major advantage of the theater style is that you can comfortable seat a large number of people. The entire room will be able see and hear the main speaker (or speakers.) So, if you are organizing an annual meeting for hundreds (or thousands) of people, you might use this style for an opening introduction. Or, if you invite a keynote speaker or comedian to speak, this room style works well.
However, this style has a huge disadvantage. The audience has no place to write or take notes. So, if your audience has handouts or printed content, avoid this conference room style. (Use the classroom style instead.) The other major disadvantage of this room setup is that it will be very difficult to get the audience to interact each other or the speaker. So when organizing a big meeting, this conference style doesn’t have as many uses as other styles.
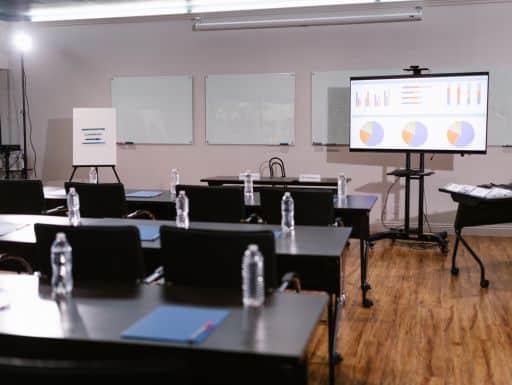
Classroom Style: A Series of Six foot by One Foot Tables Set Up in Rows.
 Classroom Style is one of the most useful room set up styles for larger groups. This style works well because it is flexible and has more advantages than disadvantages. The classroom style won ‘t fit as many people comfortably as theater style. But, the extra space and the ability to have a place to set a drink, laptop, or notepad make this style more comfortable.
The advantages are that you can comfortably fit more people using this style and everyone in the room can see the presenter. Also, every audience member has his or her own space. And no one has to sit with their back to the stage. Another huge advantage is that the speaker has more control and authority in the room. It is easier to get and keep the attention of the audience.
The only real disadvantage to this style is that you’ll have difficulty getting groups to interact in teams. If you want to create small groups to discuss items from the meeting, you may need to get a row to turn around. When you do this, you’d need to leave the stage to give instructions.
Still though, this is the conference room style that I use most often when I set up meeting rooms.
Banquet Style: Six to Ten People Gather Around Big Round Tables.
 A Banquet Style Room Setup is probably the most common conference room style for huge meetings. It gives a lot of the advantages of classroom style. However, it also allows the people at each table to interact with each other. So, this style allows for more small group discussions.
Each audience member styles gets adequate space. They also get to see the people at their table face-to-face as with the boardroom style. So, this conference room style is kind of a hybrid between classroom style and boardroom style.
A major disadvantage, though, is that this style takes up a lot of space. So, it is more expensive if you are renting space from a hotel or convention center. The other major disadvantage is that some people at the table with have limited view of the stage. They often have to turn their chairs when speakers are talking. So, they lose the advantage of having the personal space.
Still, though, this style has works well if you want a big group of people to interact with each other. It allows you to have tables discuss items with each other and brainstorm solutions to challenges.
Part Two: Best Practices for Proper Conference Room Set Up for Presentations (How to Set Up a Meeting Room.)
 You may be asking, “Why do I care how the conference room is set up if I’m presenting?” Well, if you go against the suggestions earlier, it can cause strange things to happen. These strange things can make you more nervous.
For instance, if you cram 20 people into a boardroom, they will be uncomfortable. You may be presenting well, but the facial expressions from the audience may be less-than-cordial. If multiple people in the room are giving you negative facial expressions, you might begin to feel a little more self-conscious.
Basically, the way you set up the conference room can either make presenting easier or make it harder. Improper room setup can cause challenges that you just don’t want or need when you present.
Below are some of my favorite ways to set up a conference room for a presentation. These are the “best practices” that I have discovered over 20 years of presenting.
1) Present from the Short-Side of the Conference Room.
 This seems pretty basic, but you’d be shocked if you knew the number of times presenters violate this tip. I think this occurs because people get presentation rooms confused with media rooms. For instance, if I go to a movie theater, I want to have the screen take up the whole wall. I came to see the movie. However, if I came to hear a presenter, the bigger the wall behind the speaker, the smaller the speaker will appear.
In the podcast that I did about eye-contact, I gave an example of how this can cause challenges. The analogy that I used there was to think about sitting in a movie theater with only three rows of seats. If you happen to be on either end, your view isn’t great. If you are the speaker, it is even worse. It is difficult for you to keep eye contact with the people on either side of the room.
To fix this, just present from the “short” side of the room. If you are presenting in a rectangular room, you will have two short walls and two long walls. Present from the short wall that is farthest away from the main door to the room.
By the way, a good A/V person can make presenting on the long-side of the room better. They will often set up big screens on both sides of the stage. This allows the audience to be closer to the speaker and still see the visual aids. Still though, this is just fixing a symptom caused by another problem.
2) Make Yourself the Center of Attention, Not the Visual Aid.
 People will often put the visual aid screen right in the center of the presentation wall. When you do, you are basically saying that the visual aid is more important than what you are saying. Instead, set up your presentation screen off to the side. This will allow you to present from the center of the room. (You will be the center of attention.)
When presenters violate this room setup tip, it can cause some major problems with delivery. For instance, the speaker will often move to the side of the room and look at the visual aid screen as he or she speaks. Obviously, the audience will look at the screen as well. Now that the visual aid is the center of attention, the speaker will often move behind the audience to continue to speak. Instead of being an interesting dialogue between the speaker and the audience, the presentation will become a monologue.
This room setup for a presentation can lead to the click… talk… click… talk method of delivery. (This is really boring.) So, move your screen to the side.
3) Get Rid of the Lectern.
 Many presenters like to stand behind a lectern and put a few notes in front of them. This is bad on two counts. First, now there is a barrier between you and your audience. Second, when you refer to your notes, you will lose even more connection with your audience.
If you feel like you need to have notes to deliver your presentation, make sure to read How to Memorize Your Speech. This post gives a number of tips that will allow you to deliver your entire presentation without notes.
Just so you know, standing behind a lectern is a technique that presenters sometimes use to feel more comfortable. In reality, though, it often makes people more nervous. Any time we feel threatened, we want to put something between us and the potential threat. In martial arts, students are taught to put their hands (fists) between themselves and the threat. For presenters, we put a lectern between us and the threat. A good example of how the demeanor of a presentation changes with a lectern is political debates. Candidates who feel like they have an advantage connecting with voters on a personal level always favor “town hall” style debates. (Just as an FYI, audiences do too.)
4) Place Whiteboard or Flipchart to the Proper Side When You Set Up Your Room for a Presentation.
 If you are going to write on a flipchart or whiteboard, place it to the side of you that is opposite of your writing hand. I’m left-handed. As a result, I will place my whiteboard to my right. I do this so that when I write on it, I don’t have to turn my back to the audience.
If I forget and place the board on the wrong side of the room, I will have to cross in front of the board and stand on the opposite side to write. I makes for an awkward transition in the speech.
Also, since I’m left-handed, I pay attention to moving the whiteboard for each presenter. Just before I introduce the next speaker, I will move the stand over for a right-handed person. Obviously, if you are the meeting leader and every speaker is right-handed, this is much easier. But you’ll be surprised at how many speakers are left-handed. So, pay attention.
5) Chevron Style Room Set Up Is My Favorite Conference Room Setup Style.
![]() My very first professional speaking coach was a big believer in the “Chevron Style” of room setup. She had good reason to think so. If you are looking for a way to set up a room where the speaker has the best connection with the audience then this setup is perfect. This style works best with six-foot by one-foot classroom tables. However, it can also be used with any type of room where there are multiple long, skinny tables.
My very first professional speaking coach was a big believer in the “Chevron Style” of room setup. She had good reason to think so. If you are looking for a way to set up a room where the speaker has the best connection with the audience then this setup is perfect. This style works best with six-foot by one-foot classroom tables. However, it can also be used with any type of room where there are multiple long, skinny tables.
Basically, you set up your room classroom style. This is rows of six-foot tables straight across. However, put an isle in the middle of the room that is maybe six-foot or so wide. Then, move the edge of the table that is on the isle back about three feet, so that the tables now angle toward the front-center of the room. Instead of the rows being straight across, now, they will be slightly “V” shaped.
When you set up your room for a presentation this way, you are creating a stage to present from. Basically, you can now walk into your isle to be closer to the audience. However, when you do, the folks on the front row don’t have to crank their necks to follow you. They will be looking directly at you.
Best Practices for Room Set Up for a Presentation in a Boardroom
If you are presenting in a boardroom, many of the tips still work. You still want to present from the short-side of the room. If the room has a dropdown screen that is in the center of the room or on the long-side of the room, you can always just project onto a whiteboard. (I do this a lot when I use boardrooms.) It allows me to be able to write on my slides as well, so it is really helpful.
The biggest suggestion I can make about presenting in a boardroom is to stand up when you speak. If everyone is seated in the boardroom (including you) when you start your presentation, just stand up to call attention to your visual aid. (Then don’t ever sit back down.)
Never, ever, ever sit on one side of a boardroom table and use visual aids on the opposite side of the table. This is the HUGE mistake that amateur presenters make that will cause your presentation to be so boring, you will put your audience to sleep. Avoid it at all costs. Stand up and use your visual aid to add to your verbal presentation — not replace it.